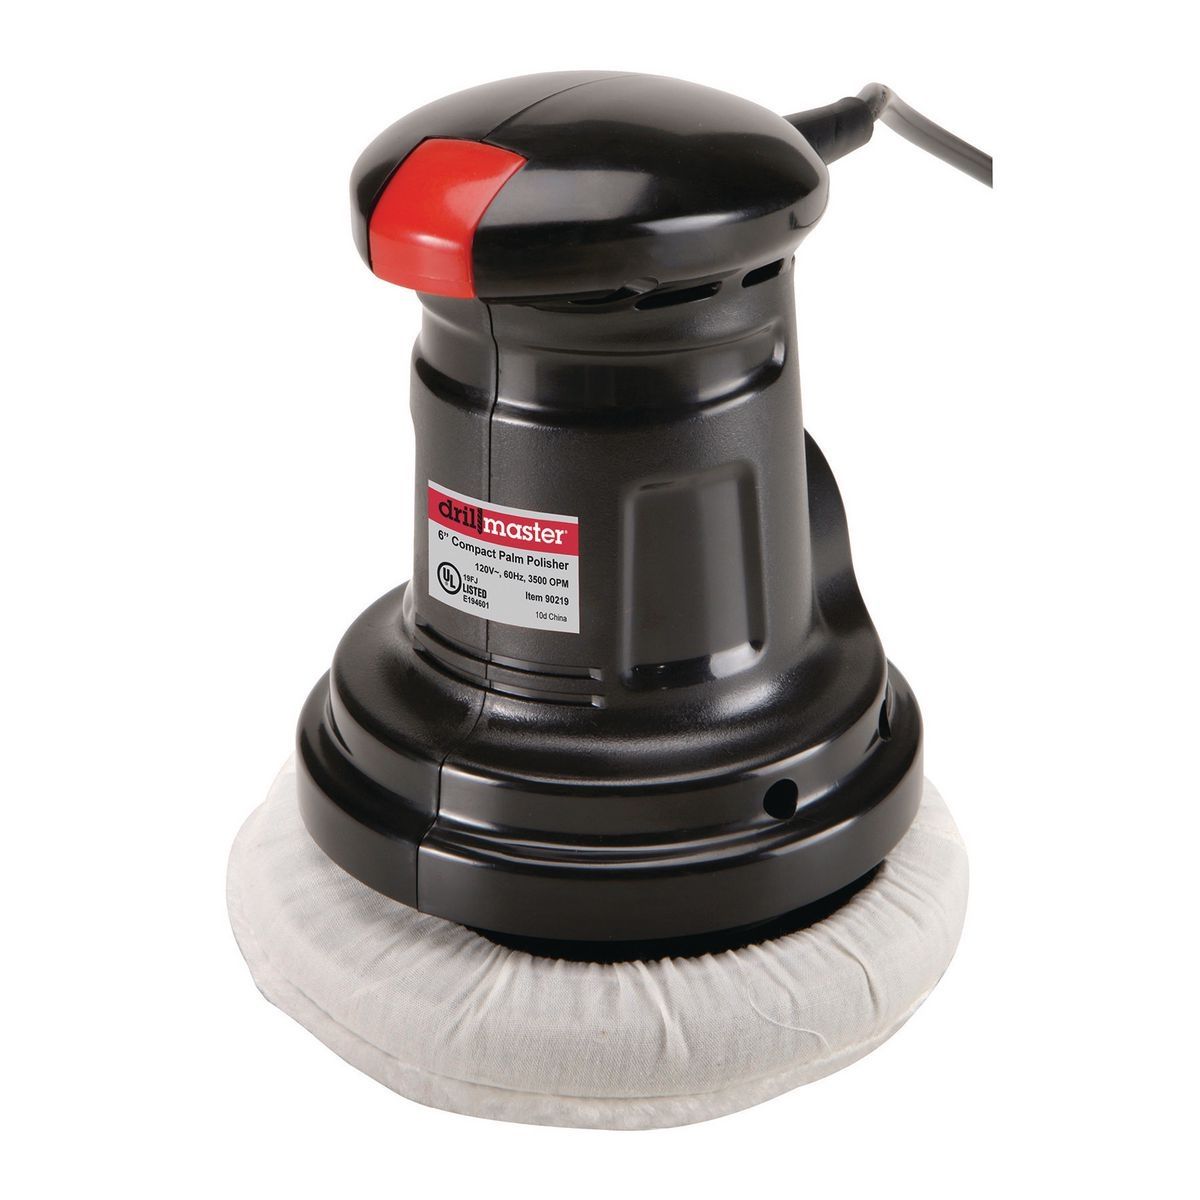
DRILL MASTER 0.7 Amp 6 in. Compact Palm Polisher
- Give your car or other vehicle a swirl-free shine with this lightweight 6 in. compact palm polisher. The polisher features an oval grip design for better control and works with standard 6 in. polishing pads and bonnets. You’ll get the job done quickly with a motor that produces 3500 OPM (orbits per minute).
- Random orbit action for a swirl-free finish
- Oval palm grip design for better control
- Durable high-impact housing
$12.97
From DIY Novice to Polishing Pro: Everything You Need to Know About This Budget-Friendly Tool
When I first decided to tackle my own car detailing and home improvement projects, I found myself staring at the tool aisle, completely overwhelmed by options. After countless hours of research and hands-on testing, I discovered what might be the best-kept secret in the budget polisher market: the Drill Master 0.7 Amp 6 In. Compact Palm Polisher. This unassuming little powerhouse has completely transformed how I approach polishing tasks, and I’m excited to share my comprehensive experience with you.
As someone who’s been using this tool regularly for everything from rejuvenating my car’s finish to bringing new life to old furniture, I can confidently say that this affordable palm polisher offers exceptional value for both beginners and experienced DIYers alike. Let me walk you through everything you need to know about this versatile tool.
What Exactly Is the Drill Master 0.7 Amp 6 In. Compact Palm Polisher?
Before diving into my personal experiences, let’s establish what we’re talking about. The Drill Master 0.7 Amp 6 In. Compact Palm Polisher is a lightweight, handheld power tool designed specifically for polishing various surfaces. Don’t let its modest price tag fool you—this little tool packs a surprising punch in its compact frame.
At its core, it’s a random orbital polisher, meaning the polishing pad moves in a random pattern while spinning to prevent swirl marks and achieve a more even finish. This design makes it particularly forgiving for beginners (like I was when I first picked it up). The “6 In.” in its name refers to the diameter of the polishing pad it accommodates, while the “0.7 Amp” indicates its motor power rating.
When I first held it, I was immediately struck by how comfortable it felt in my hand. Weighing just under 4 pounds, it’s substantially lighter than many professional-grade polishers, which means less arm fatigue during extended polishing sessions. The ergonomic design includes a comfortable grip area that reduces vibration transfer to your hands—something I’ve come to appreciate during longer projects.
How Does This Compact Palm Polisher Actually Work?
The operating principle is straightforward but effective. The motor drives a backing plate in a dual-action orbital pattern: the pad spins on its axis while simultaneously moving in small circles. This random orbital action is crucial because it prevents creating swirl marks or “holograms” that often plague surfaces polished with rotary-only tools.
When I first switched it on, I was pleasantly surprised by the smooth operation. The power switch is conveniently located where your thumb naturally rests, allowing for easy one-handed operation. The 0.7 Amp motor generates enough power to effectively polish without being overwhelming or difficult to control.
One aspect I particularly appreciate is that unlike more powerful professional polishers, this tool is forgiving enough that you can pause briefly on one spot without immediately burning through clear coat or damaging wood finishes. This feature alone makes it an excellent choice for novices just learning proper polishing technique.
The Technical Specifications Worth Knowing
Let’s get into the nitty-gritty details that make this polisher stand out:
- Motor Power: 0.7 Amp (120V, 60Hz)
- Pad Size: 6 inches diameter
- Speed: Approximately 4,000 OPM (orbits per minute)
- Weight: 3.75 pounds
- Cord Length: 6 feet
- Construction: Durable plastic housing with rubber grip areas
- Backing Plate: Hook and loop attachment system for easy pad changes
While some might initially balk at the fixed speed (many professional models offer variable speed settings), I’ve found that the 4,000 OPM setting strikes an excellent balance for most general polishing tasks. It’s fast enough to effectively remove minor scratches and oxidation but slow enough to remain controllable and safe for various surfaces.
The 6-foot cord isn’t the longest on the market, but it’s sufficient for most applications. I typically pair it with a quality extension cord when working on vehicles or larger furniture pieces.
The Price Point: Why It’s Such an Attractive Option
One of the most compelling features of the Drill Master palm polisher is its price. Typically retailing between $30-$40, it costs a fraction of what you’d pay for professional-grade polishers that often start at $150 and quickly climb well above $300.
This affordability made it an easy entry point for me when I was just starting to explore car detailing and furniture restoration. I initially worried that the low price would translate to poor performance or rapid failure, but after two years of regular use, I’m happy to report that my concerns were unfounded.
For context, professional detailers might need the additional features and power of premium models, but for weekend warriors and DIY enthusiasts, the value proposition of the Drill Master polisher is difficult to beat. I’ve completed dozens of projects with mine, from removing water spots on my car’s hood to restoring an antique dining table, all without feeling limited by the tool’s capabilities.
Where to Purchase the Drill Master Palm Polisher
The Drill Master polisher is primarily available through Harbor Freight Tools, both in their physical retail locations and through their online store. I picked mine up during one of their frequent sales, making the already affordable tool an even better bargain.
Harbor Freight regularly offers coupons and discounts on their tools, so with a bit of patience, you might snag one for even less than the standard retail price. I’ve noticed they often include this polisher in their holiday and seasonal sales events.
If you prefer online shopping, the polisher is generally available through Harbor Freight’s website with shipping options or in-store pickup. Occasionally, you might find it through third-party marketplaces, though I would recommend purchasing directly from Harbor Freight to ensure you’re getting a new, warrantied product.
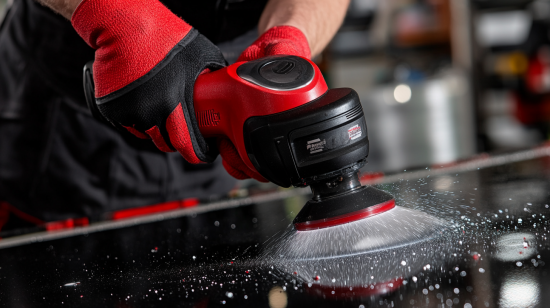
Real-World Applications: What Can You Actually Polish With It?
After extensive experimentation, I’ve successfully used the Drill Master palm polisher on a wide variety of surfaces:
Automotive Applications
My first project was tackling the faded, oxidized paint on my decade-old sedan. I was genuinely shocked by the results. Using the polisher with a cutting compound followed by a finishing polish, I was able to restore a deep shine that I hadn’t seen since the car was new.
The compact size proved perfect for navigating the curves and contours of automotive bodywork. I found it particularly effective on:
- Removing light scratches and swirl marks from clear coat
- Eliminating water spots and environmental contaminants
- Restoring headlight clarity (with appropriate compounds)
- Applying and removing wax or sealant evenly and efficiently
- Polishing chrome and metal trim pieces
The random orbital action meant I could work confidently without worrying about burning through the paint—a common concern with more aggressive rotary polishers.
Woodworking Projects
Beyond automotive use, I discovered this polisher excels at wood finishing. When restoring an old oak coffee table, I used it to:
- Apply and buff furniture oils and waxes
- Even out polyurethane finishes for a glass-like smoothness
- Remove water rings and surface scratches
- Polish turned wooden pieces with intricate details
The tool’s maneuverability made it possible to reach into carved details that would have been tedious to polish by hand. The results were impressive—a deep, lustrous finish that highlighted the natural beauty of the wood grain.
Metal Polishing
The versatility extended to metal surfaces as well. I’ve successfully used it for:
- Polishing tarnished brass fixtures
- Restoring stainless steel appliances
- Bringing a mirror finish to copper cookware
- Cleaning and polishing aluminum wheels
For metal applications, I found that specialized metal polishing compounds paired with the appropriate pads yielded professional-quality results that would have cost substantial money if outsourced.
Is It Suitable for Beginners? My Experience Says Yes
As someone who started using this polisher with zero prior experience, I can confidently say it’s one of the most beginner-friendly power tools I’ve encountered. Several features make it particularly accessible:
- Lightweight Design: The fatigue factor is minimal, allowing beginners to focus on technique rather than struggling with tool weight.
- Forgiving Operation: The random orbital action significantly reduces the risk of damaging surfaces compared to more aggressive rotary polishers.
- Simple Controls: With just an on/off switch and no complex settings to configure, there’s virtually no learning curve to operation.
- Low Investment Risk: The affordable price point means beginners can experiment without the pressure of justifying an expensive tool purchase.
One afternoon, I invited a friend who had never used any power tools to help me polish my car. After a quick five-minute demonstration, he was confidently working on the vehicle’s doors and achieved results that were indistinguishable from the sections I had polished. This real-world test convinced me that this tool truly excels as an entry point for novices.
Comparing the Drill Master to Other Polishers on the Market
To provide some context, I’ve had the opportunity to use several other polishers, including some professional-grade models. Here’s how the Drill Master stacks up:
vs. Professional Dual-Action Polishers (e.g., Porter-Cable 7424XP, $150+)
Advantages of professional models:
- Variable speed settings for more precise control
- More powerful motors for faster correction of deeper defects
- Longer warranties and better parts availability
- More substantial construction for daily professional use
Where the Drill Master holds its own:
- Nearly identical orbital motion pattern for swirl-free results
- Significantly lighter weight for less user fatigue
- Simpler operation for casual users
- Dramatically lower price point
vs. Entry-Level Rotary Polishers ($60-$100)
Advantages of rotary polishers:
- More aggressive cutting action for severe defect correction
- Generally higher power outputs
- Often more durable construction
Where the Drill Master excels:
- Much safer for beginners (nearly impossible to burn through paint)
- Less vibration for more comfortable extended use
- Better results for finishing and waxing applications
- More versatile across different materials
vs. Manual Polishing
Advantages of the Drill Master over hand polishing:
- Exponentially faster results
- More even pressure application
- Less physical exertion
- Better finished quality, especially on larger surfaces
After all my comparisons, the conclusion I’ve reached is that while the Drill Master certainly has limitations compared to professional tools, it occupies a sweet spot in the market that makes it an ideal choice for enthusiastic DIYers who want quality results without a significant investment.
What Comes in the Box and What You’ll Need to Add
When I unboxed my Drill Master polisher, it came with:
- The polisher unit itself
- A hook-and-loop backing plate
- A basic foam polishing pad
- Instruction manual
- Warranty card
While functional as-is, I quickly discovered that expanding my collection of accessories significantly increased the tool’s versatility. Here’s what I recommend adding:
Essential Accessories:
- Additional Polishing Pads: I picked up a set of color-coded foam pads in varying densities (cutting, polishing, and finishing). Having dedicated pads for different compounds prevents cross-contamination.
- Microfiber Bonnets: These slip over the foam pads and are excellent for applying waxes and sealants.
- Quality Compounds and Polishes: The tool is only as effective as the products you use with it. I’ve had great results with Meguiar’s and Chemical Guys products.
- Pad Cleaning Tool: This simple spur-like device helps remove dried polish from foam pads, extending their usable life.
- Pad Cleaning Solution: A dedicated pad cleaner helps maintain your pads and ensures consistent results.
My total investment, including the polisher and all these accessories, still came in under $100—far less than the cost of a single professional polishing session for my car.
Durability: How Long Can You Expect It to Last?
A common concern with budget tools is longevity. After two years of regular weekend use, I can report that my Drill Master polisher continues to function flawlessly. The motor shows no signs of weakening, and the backing plate remains securely attached.
There are some signs of wear, of course. The plastic housing has a few scuffs from being set down on various surfaces, and the power cord shows some flexibility loss near the strain relief—but these are cosmetic issues that don’t affect functionality.
Based on my experience and conversations with other owners, you can reasonably expect 3-5 years of casual use from this tool. Professional daily use would likely shorten this lifespan considerably, but that’s not the intended use case for this polisher.
The most vulnerable component appears to be the on/off switch, which has occasionally been reported to fail in some units. However, Harbor Freight’s warranty (more on that below) should cover such defects within the warranty period.
Understanding the Warranty and Support
Harbor Freight offers a 90-day warranty on the Drill Master polisher. While this is shorter than warranties for premium tools, it’s generally sufficient to identify any manufacturing defects that might be present.
In my experience, Harbor Freight’s return process is straightforward. When I had an issue with a different tool (not the polisher), I simply brought it back to the store with my receipt, and they processed an exchange with minimal questions.
For the budget-conscious buyer, Harbor Freight also offers an extended protection plan for a few dollars more, which extends coverage to a full year. Given the low cost of the tool itself, I personally didn’t opt for this, but it might provide peace of mind for those planning intensive use.
Practical Tips for Getting the Most from Your Drill Master Polisher
Through trial and error, I’ve developed several techniques that help maximize the effectiveness of this tool:
1. Proper Speed and Pressure
Despite the fixed speed, you can control the aggressiveness of the polish by varying your pressure. I’ve found that:
- Light pressure (just the weight of the tool) works best for final polishing and waxing
- Medium pressure helps with light defect removal
- Slightly firmer pressure can tackle more stubborn issues
However, never press so hard that the pad rotation slows significantly—this can generate excessive heat and potentially damage surfaces.
2. Pad Conditioning
Before using a new pad, I always “condition” it by applying the product to the pad and working it in with my fingers. This prevents dry buffing and ensures even product distribution from the start.
3. Work Pattern
I’ve achieved the best results using a crosshatch pattern:
- First pass: working in straight lines horizontally
- Second pass: working in straight lines vertically
- Final pass: small overlapping circles for blending
This method ensures complete, even coverage without missing spots.
4. Temperature Management
The Drill Master can generate heat during extended use. I’ve found it beneficial to:
- Work in sections of approximately 2′ x 2′
- Allow the tool to cool for a few minutes after 15-20 minutes of continuous use
- Never let compounds or polishes dry completely on the surface
Following these guidelines has helped me avoid any heat-related issues with both the tool and the surfaces being polished.
Maintenance and Cleaning: Extending Tool Life
To keep my Drill Master polisher in top condition, I’ve established a simple maintenance routine:
After Each Use:
- Unplug the tool and wipe down the housing with a damp cloth
- Remove the polishing pad and clean or rinse according to pad type
- Check the backing plate for any built-up polish and clean as needed
- Inspect the cord for any damage or wear
- Store in a dust-free area (I use the original box)
Monthly Maintenance:
- Check all screws and tighten if necessary
- Blow out any dust from the motor vents using compressed air
- Apply a drop of light machine oil to the bearing if the pad movement feels rough
- Inspect the backing plate for wear and replace if showing signs of damage
This minimal maintenance has kept my polisher operating like new, and I expect it will continue to serve me well for years to come.
Common Issues and How to Address Them
No tool is perfect, and through my own experience and conversations with other users, I’ve identified a few common issues with the Drill Master polisher:
1. Excessive Vibration
If you experience uncomfortable vibration during use, check for:
- Uneven product distribution on the pad
- Damaged or warped backing plate
- Unbalanced foam pad
The solution is usually as simple as replacing the affected component or redistributing the polish more evenly.
2. Motor Overheating
If the housing becomes very hot during use:
- Take more frequent breaks
- Ensure ventilation slots aren’t blocked
- Avoid applying too much pressure, which makes the motor work harder
3. Inconsistent Results
Uneven polishing results are typically caused by:
- Working too large an area at once
- Inconsistent pressure application
- Using the wrong pad for the compound
- Moving the polisher too quickly across the surface
Slowing down and working methodically in smaller sections usually resolves these issues.
The Final Verdict: Pros and Cons
After extensive use across numerous projects, here’s my balanced assessment of the Drill Master 0.7 Amp 6 In. Compact Palm Polisher:
Pros:
- Exceptional value for the price point
- Lightweight and comfortable for extended use
- Safe random orbital action prevents damage to surfaces
- Versatile applications across automotive, wood, and metal polishing
- Simple operation ideal for beginners
- Surprisingly durable construction given the price
- Compact size for storage and transportation
- Compatible with industry-standard 6-inch pads
Cons:
- Fixed speed limits versatility for specialized applications
- Short 6-foot power cord sometimes requires extension cord
- Basic included pad requires immediate upgrades for serious work
- 90-day warranty is shorter than professional tools
- Motor power insufficient for heavy correction work
- No carrying case included
When considering these factors holistically, I believe the Drill Master polisher represents one of the best values in the DIY polishing market today. For beginners and occasional users, it offers 80% of the performance of professional tools at less than 25% of the cost.
Is This the Right Polisher for You?
Based on my experience, I would recommend the Drill Master 0.7 Amp 6 In. Compact Palm Polisher for:
- DIY enthusiasts looking to maintain their vehicles without professional detailing costs
- Woodworkers seeking a tool for applying and buffing finishes
- Homeowners with occasional metal or surface restoration projects
- Beginners exploring polishing techniques without significant investment
- Anyone on a tight budget who still wants respectable results
However, I would suggest looking at more professional options if you:
- Need to regularly correct severe paint defects or deep scratches
- Plan to use a polisher professionally or daily
- Require variable speed settings for specialized applications
- Will be working on extremely valuable surfaces where mistakes would be costly
Final Thoughts: A Surprising Value Proposition
When I first purchased the Drill Master palm polisher, I viewed it as an entry-level tool that I would eventually upgrade from. Two years later, despite having access to more expensive options, I still reach for it regularly. The combination of lightweight operation, adequate power, and simple functionality makes it my go-to for maintenance polishing on my vehicles and quick furniture touch-ups.
While professionals might scoff at its modest specifications, the real-world results speak for themselves. I’ve received numerous compliments on my car’s finish and restored furniture pieces—with most people assuming I either paid professionals or used much more expensive equipment.
For the average homeowner or DIY enthusiast, this affordable polisher strikes the perfect balance between capability, usability, and value. It’s opened up possibilities in my DIY arsenal that would have been financially out of reach if I had insisted on professional-grade equipment from the start.
Whether you’re just beginning your polishing journey or looking to add an accessible, lightweight option to your existing toolkit, the Drill Master 0.7 Amp 6 In. Compact Palm Polisher deserves serious consideration. It might just surprise you with what it can accomplish, as it has repeatedly surprised me over the past two years of ownership.